Caution! Read all safety warnings and instructions!
Please keep this Instruction Manual at hand for future reference.
Read these General Safety Instructions and the Instruction Manual carefully and follow all instructions. The PIRASTRO KorfkerRest® must be correctly used and fitted to provide increased com-fort and support while playing and to avoid injury to you or damage to your instrument. The PIRASTRO KorfkerRest® could damage your instrument if it comes loose and impacts your instrument, or if it slips off causing you to lose control of your instrument. Incorrect use or maintenance could also result in physical discomfort or interruptions while playing your instrument or, in rare cases, in physical harm.
Please observe the following safety recommendations:
Check the firm attachment and correct setup of your PIRASTRO KorfkerRest® before every use. Refer to the Instruction Manual for details.
Check all screws are firmly tightened before every use and especially after adjustments have been made. Improperly tightened screws can lead to sudden instability of your PIRASTRO KorfkerRest®. If the Torx key is used improperly or with excessive force, its sharp edges can cause damage to the instrument or even injury to the user.
Check all parts of your PIRASTRO KorfkerRest® for damage, wear and tear before every use. If worn-out or damaged parts are detected do not use your PIRASTRO KorfkerRest® until these parts have been replaced. Continued use can lead to direct damage to the instrument, to instability of your PIRASTRO KorfkerRest® or to discomfort while playing your instrument.
Bend the wood of your PIRASTRO KorfkerRest® with care. Fast, forceful or careless bending can cause the wood to crack or even break. In rare cases this can result in physical harm if the wood splinters. If in doubt, ask an experienced luthier to assist in shaping your PIRASTRO KorfkerRest®.
Before making adjustments, always detach your PIRASTRO KorfkerRest® and move your instrument to a safe place.
Step 2
(For viola players only, violinists continue with step 3)
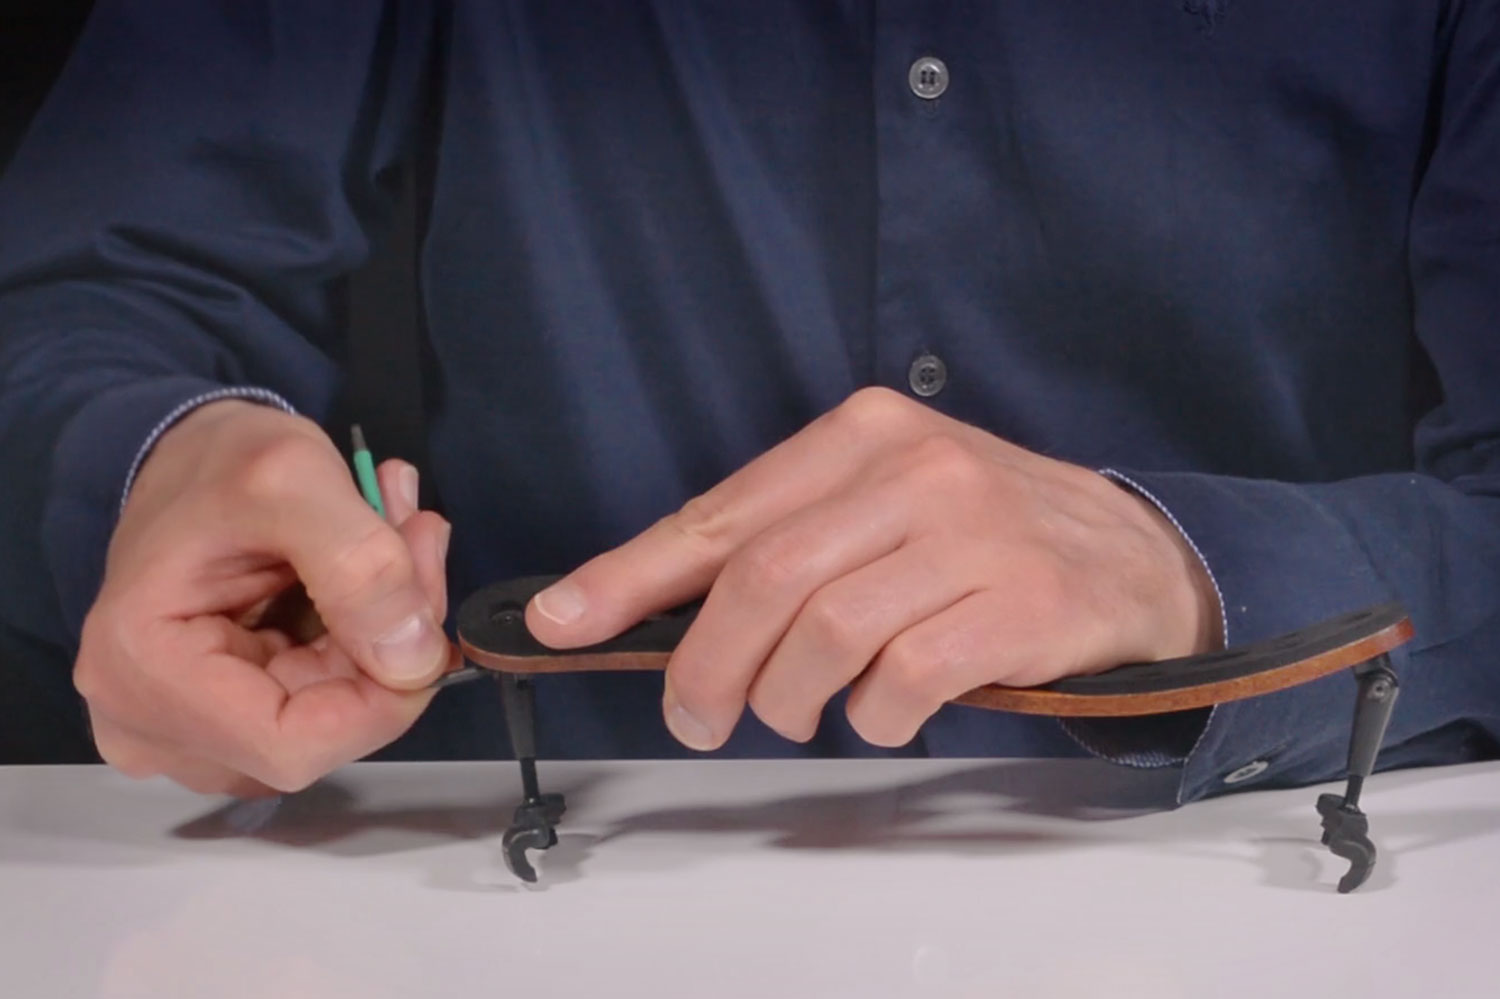
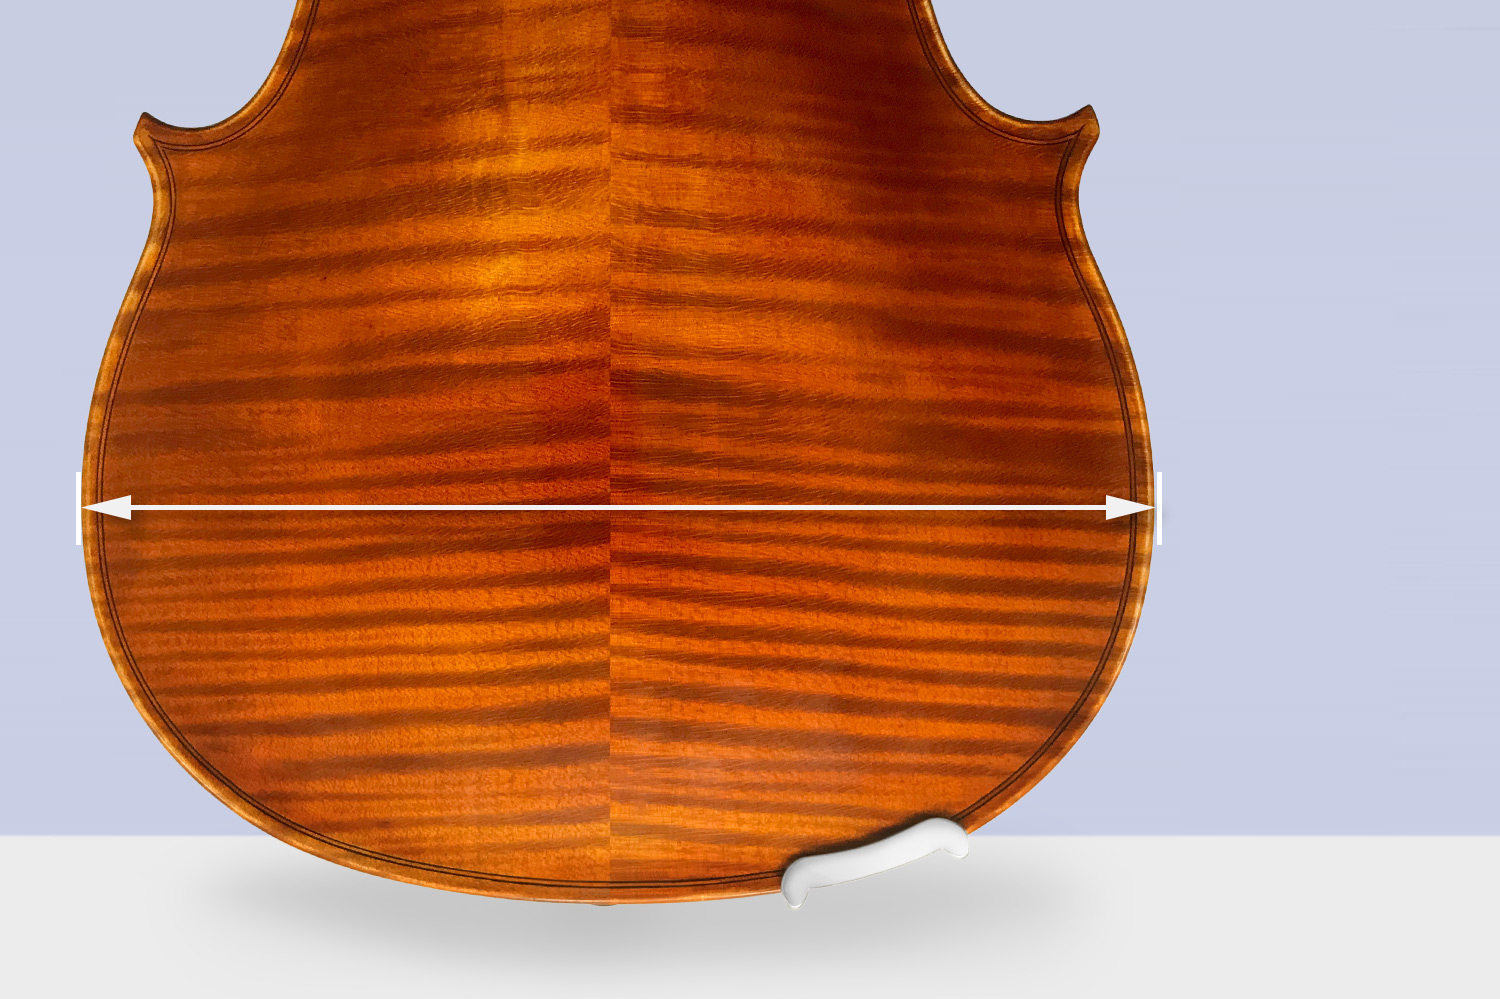
Check the size of your viola at the lower bouts. If it measures between 23.5 – 24.5 cm, please continue to step 3 of this guide.
For wider or narrower instruments please read the section entitled »Adjusting the PIRASTRO KorfkerRest® for Viola to the size of your instrument« before continuing to step 3.
Not correctly adjusting the size before use can damage the PIRASTRO KorfkerRest® or your instrument.
Step 3
If the PIRASTRO KorfkerRest® is too tight or too loose for your instrument, adjust it by loosening the Torx screw of the shoulder side leg and tilting the hinge joint inwards or outwards. Tighten the Torx screw again fimly afterwards.
IMPORTANT
If the rubber feet slip during playing, the setup needs to be corrected by »Adjusting the legs« and/or »Narrowing the PIRASTRO KorfkerRest®«.
Bending the PIRASTRO KorfkerRest®
The PIRASTRO KorfkerRest® has been pre-bent to a shape that has proven to be comfortable for many players. A unique feature of this PIRASTRO KorfkerRest® is that its shape can be changed by manual bending to fit the individual, as seen in picture 1, 2 and 3.
INSTRUCTIONS FOR BENDING THE WOOD
-
The wood of your PIRASTRO KorfkerRest® has a bending limit. By bending the wood slowly and carefully you will feel when it cannot bend any further. Do not force the wood to bend beyond this point.
-
Please keep in mind that small adjustments can have a significant effect on comfort.
-
Clamping the PIRASTRO KorfkerRest® onto the instrument will increase the shoulder curve slightly.
-
When the wood of your PIRASTRO KorfkerRest® is bent and its shape altered, the legs might need to be readjusted. Please refer to the section entitled »Adjusting the legs«.
-
Ideally, after bending it to the required shape, give the wood 2-3 hours off the instrument to stabilize before regular playing.
See the following video:
Video: Bending the rest
> Please read and understand the General Safety Instructions availabe here.

1 Bending the rest

2 Normal bend

3 Maximum bend
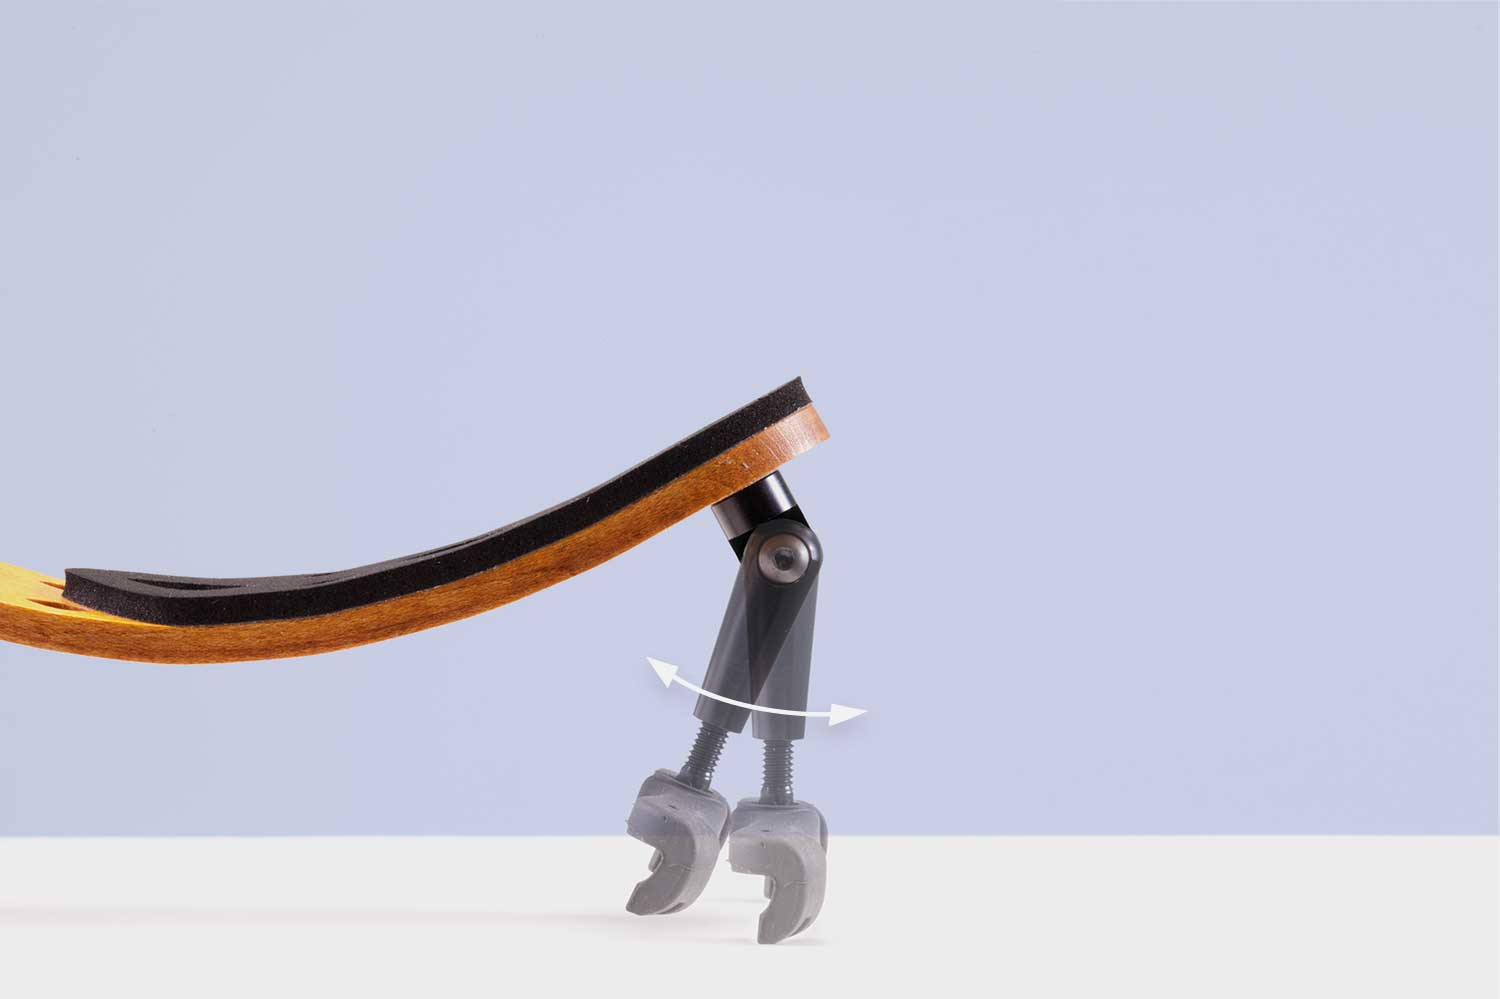
Adjusting the legs
Each leg has a Torx screw connecting the hinge joint with the base joint and a Torx flange screw connecting the base joint with the wooden bridge. When the Torx screws are tightened correctly, the locking rings prevent movement between the hinge joint and the base joint and between the base joint and the wood.
These four locking rings are essential to the functioning of your KorfkerRest® and if lost or damaged should be replaced before using the KorfkerRest®.

4 Ideal angles of the legs
Adjustments to the legs should be made in small increments.
For the maximum stability of the KorfkerRest® it is very important that the shoulder leg and chest leg meet the instrument at a straight angle when attached to the instrument.
When not attached, the two hinge joints of the KorfkerRest lean slightly towards each other (see picture 4). In order for them to do so and to ensure the ideal position of the wooden bridge in relation to the instrument, whatever adjustment is made needs to be divided between the shoulder leg and the chest leg.
After changing their position, look at both legs sideways and make sure the adjustment screws of the rubber feet are parallel to each other (see picture 7). When placed feet downwards on a flat surface, all 4 tips of the rubber feet should touch the surface. If they do not, adjust the tilt of the hinge joint of the chest leg.
After making adjustments always check all screws have been tightened firmly.
See the following video:
Video: Starting Position
> Please read and understand the General Safety Instructions availabe here.
Narrowing the PIRASTRO KorfkerRest®
Increasing the angle of the hinge joint of the shoulder leg inwards (see picture 5) will narrow the PIRASTRO KorfkerRest® and create a stronger clamping action. In order to adjust the hinge joint, loosen the Torx screw enough to allow the joint to move. Move it to the desired position and tighten the Torx screw firmly.

5 Angle of the shoulder leg
A similar adjustment needs to be made to the chest leg (see picture 6). To make the PIRASTRO KorfkerRest® narrower, loosen the Torx flange screw and slightly rotate the base joint clockwise. After tightening the Torx flange screw, loosen the hinge joint. Hold the PIRASTRO KorfkerRest® down on a table with the feet parallel to each other and all four hooks of the rubber feet touching the surface. Fix the resulting angle by tightening the Torx screw firmly.
For larger adjustments »The ErgoPack« is needed.

6 Angle of the chest leg
See the following video:
Video: Narrowing the rest
> Please read and understand the General Safety Instructions availabe here.
Widening the PIRASTRO KorfkerRest®
Straightening the hinge joint of the shoulder leg by bringing it outwards will widen your PIRASTRO KorfkerRest® and create a weaker clamping action (see picture 5). In order to adjust the hinge joint, loosen the Torx screw enough to allow the joint to move. Move it to the desired position and tighten the Torx screw firmly.

5 Angle of the shoulder leg
See the following video:
Video: Widening the rest
> Please read and understand the General Safety Instructions availabe here.
A similar adjustment needs to be made to the chest leg (see picture 6). To make the PIRASTRO KorfkerRest® wider, loosen the Torx flange screw and slightly rotate the base joint anticlockwise. After tightening the Torx flange screw, loosen the hinge joint. Hold the PIRASTRO KorfkerRest® down on a table with the feet parallel to each other and all four hooks of the rubber feet touching the surface. Fix the resulting angle by tightening the Torx screw firmly.

6 Angle of the chest leg
Changing the height of the PIRASTRO KorfkerRest®
The height of the PIRASTRO KorfkerRest® can be adjusted by turning the rubber feet into or out of the thread of the hinge joint.
When in the highest position, keep at least 5 mm of the thread inside the shaft of the barrel leg. Failing to do so can lead to instability.
When in the lowest position, do not try to turn the rubber foot in by force. Turning by force will damage the rubber foot.
EXTRA LOW POSITIONS
For extra low positions, the standard rubber foot and hinge joint can be replaced by our short rubber foot assembly (see picture 7, available separately). This will lower the minimum height by 6 mm. Short rubber foot assemblies can be used at both the shoulder and chest side of the PIRASTRO KorfkerRest®.
When installing the short rubber foot assembly, be sure to insert a locking ring between the base joint and the short hinge joint.
When using two short rubber foot assemblies, the PIRASTRO KorfkerRest® will be so low that its wooden bridge may touch the back of the violin. In this case some bend must be removed from the wooden bridge to avoid damage.

7 Rubber foot assambly, short
EXTRA HIGH POSITIONS
If a higher position is required, please use the provided flat ErgoPack joint as described in the section »Higher Positions« add up to 10 mm to the height of your chosen position.
Even higher positions are possible by replacing the standard rubber foot by our long rubber foot (see picture above, available separately). This adds up to 15 mm to the height of the PIRASTRO KorfkerRest®.
As with the standard rubber foot, when in the highest position, keep at least 5mm of the thread inside the shaft of the barrel leg. Failing to do so can lead to instability.
Using the long rubber foot in conjunction with the flat ErgoPack joint adds a total of 25 mm to the height of the PIRASTRO KorfkerRest® for a maximum height of over 80 mm.

8 Rubber foot, long
Adjusting the tilt of the PIRASTRO KorfkerRest®
The tilt of the PIRASTRO KorfkerRest® can be adjusted as seen in picture 9. In order to increase or decrease the tilt of the PIRASTRO KorfkerRest®, start with the shoulder leg. Loosen only the Torx flange screw and slightly rotate the whole leg clockwise to increase the tilt or anticlockwise to decrease it. A small rotation will have a noticeable effect. After tightening the Torx flange screw, loosen the hinge joint of the chest leg. Hold the PIRASTRO KorfkerRest® down on a table with the feet parallel to each other and all four hooks of the rubber feet touching the surface.
Fix the resulting angle by tightening the Torx screw firmly.

9 Straight and angled tilt
Take care to add tilt to your PIRASTRO KorfkerRest® in small increments. Too much tilt can lead to discomfort as the edge of the PIRASTRO KorfkerRest® may press into the shoulder. It can also cause premature wear and tear of the rubber pad. When either of these are observed, please decrease the tilt of your PIRASTRO KorfkerRest®.
See the following video:
Video: Changing the tilt of the rest
> Please read and understand the General Safety Instructions availabe here.
Returning the PIRASTRO KorfkerRest® to its original position
In its original position and when not attached to the instrument (see picture 4), the two hinge joints of the PIRASTRO KorfkerRest® lean slightly towards each other. This gives the best grip on the instrument.

4 Ideal angles of the legs
To return the PIRASTRO KorfkerRest® to its original position, first loosen all four screws. Continuing with the shoulder leg, point the rubber foot towards the centre of the PIRASTRO KorfkerRest® as seen in picture 10 and tighten the Torx flange screw.
Now swivel the hinge joint up to the angle seen in picture 4 and tighten the Torx screw firmly.
 10 Shoulder leg

11 Chest leg
Continuing with the chest leg, position this as seen in picture 11 and tighten the Torx Flange screw. Hold the PIRASTRO KorfkerRest® down on a table with the feet parallel to each other and all four hooks of the rubber feet touching the surface. Fix the resulting angle by tightening the Torx screw.
Check once more that all screws are firmly tightened before playing.
See the following video:
Video: Starting Position
> Please read and understand the General Safety Instructions availabe here.
The ErgoPack
Among the accessories of the PIRASTRO KorfkerRest® Model 2 you will find the ErgoPack. This consists of a barrel shaped joint (picture 12), a flat joint (picture 13), screws and locking rings. These two joints increase the number of positions which can be achieved with the PIRASTRO KorfkerRest® and help to adjust the Viola model to a wide range of instrument sizes.
INSTALLING THE ERGOPACK
In order to add one of the ErgoPack joints to a leg, install the chosen ErgoPack joint in between the base joint and the hinge joint.
Extra Torx screws and locking rings can be found among the accessories.

12 Barrel joint

13 Flat joint
The ErgoPack has proven to be especially useful for those with narrower violins, where narrowing the PIRASTRO KorfkerRest® as described does not provide the necessary stability and the rubber feet tend to slip during playing. For those players we advise to use the adjustments for »Narrower Violins«.
Many players have found that bringing the PIRASTRO KorfkerRest® closer to the body has given them more freedom of movement of the left arm. To try this, use the adjustments for position »Closer to the Player«.
The standard options for installation of each ErgoPack joint are shown and described in the following chapter »The most popular configurations for violin using the ErgoPack«.
The most popular configurations for violin using the ErgoPack
NARROWER VIOLINS
Adjusting the PIRASTRO KorfkerRest® for narrower violins can be done with S1 or C1. Using S1 the PIRASTRO KorfkerRest® will point further over the shoulder, using C1 the KorfkerRest® will lie more towards the chest. In special cases the PIRASTRO KorfkerRest® can even be made to fit ¾ violins by using both S1 and C1. Please check if the size and height of the PIRASTRO KorfkerRest® is suitable for the young player in question.
 S1 Shoulder leg with flat joint
 C1 Chest leg with barrel joint
HIGHER POSITIONS
To elevate the position of the violin use C2. Using S2 simultaneously with C2 can give further comfort by positioning the shoulder side of the PIRASTRO KorfkerRest® where there is less space between the violin and the shoulder.
If a higher position is required, please consider ordering the long rubber foot. Its use is described in the chapter »Changing the height of the PIRASTRO KorfkerRest®«.
 S2 Shoulder leg with barrel joint
 C2 Chest leg with flat joint
CLOSER TO THE PLAYER
To bring the KorfkerRest® closer to the player use both S2 and C3
S2 Shoulder leg with barrel joint
 C3 Chest leg with flat joint
LOWER ON CHEST
To move the KorfkerRest® towards the chest use both S3 and C1.
 S3 Shoulder leg with flat joint
 C1 Chest leg with barrel joint
FURTHER OVER THE SHOULDER
Position the PIRASTRO KorfkerRest® further over the shoulder with both S1 and C4.
S1 Shoulder leg with flat joint
 C4 Chest leg with barrel joint
Adjusting the PIRASTRO KorfkerRest® for Viola to the size of your instrument
The PIRASTRO KorfkerRest® for Viola can be adjusted to fit all viola sizes. The supplied ErgoPack joints should be used to make adjustments beyond the standard setting of 23.5 to 24.5 cm (width of the lower bouts of your viola).
INSTALLING THE ERGOPACK
In order to add one of the ErgoPack joints to a leg, install the chosen ErgoPack joint in between the base joint and the hinge joint.
Extra Torx screws and locking rings can be found in the accessories.
When adding the adjustment joint to the chest leg, also rotate the base joint so the adjustment joint points inwards or outwards as seen in the pictures.
After having added or removed adjustment joints, please always check if the tilt of the PIRASTRO KorfkerRest® is still as desired and the positions of the legs are correct as described in »Adjusting the legs«.
Always tighten all screws firmly before using the KorfkerRest®.
The parts of the ErgoPack not used for size adjustment can be used to create alternative positions as described in the ErgoPack section for violin.
SMALL VIOLAS (22 - 23.5 cm)
Use S1 or C1.
Using S1 the PIRASTRO KorfkerRest® will point further over the shoulder, using C1 the PIRASTRO KorfkerRest® will lie more towards the chest. If this configuration is still too wide, use S1 and C1 simultaneously.
S1 Shoulder leg with flat joint
C1 Chest leg with barrel joint
MEDIUM SIZED VIOLAS (23.5 - 24.5 cm)
These do not need any of the ErgoPack parts for size adjustment. In this case the ErgoPack may be used to create the same configurations as for the violin model as described in the »ErgoPack section for violin«.
LARGE VIOLAS (24.5 cm and wider)
24.5 - 25.5 cm: Use S3 or C4. Using S3 the PIRASTRO KorfkerRest® will lie more towards the chest, using C4 the PIRASTRO KorfkerRest® will point further over the shoulder.
25.5 cm or wider: Use S3 and C4 simultaneously.
S3 Shoulder leg with flat joint

C4 Chest leg with barrel joint
The rubber feet
For the best grip on the instrument, keep the rubber free from dust and dirt. Clean with a damp cloth. Over time and depending on usage, the rubber of the feet may wear. Please check the condition of the rubber before every use and replace a foot as soon as damage has been detected.
Replacing the rubber pads
Starting off at one of the ends, first remove the worn out rubber pad. Then peel the backing off one of the replacement rubber pads included among the accessories. Position the new pad by aligning the round hole exactly around the Torx flange screw, then align the other end of the pad around the large eye. While slightly flexing the PIRASTRO KorfkerRest®, press down the middle part of the pad. Before using your PIRASTRO KorfkerRest®, press the whole rubber pad strongly onto the wood, especially around its entire edge.
Beware that in some cases wood fibres can come off with the strong adhesive.
See the following video:
Video: Replacing the pads
> Please read and understand the General Safety Instructions availabe here.
The locking rings
The PIRASTRO KorfkerRest® derives part of its superior stability from the 4 locking rings. Their correct functioning should be checked before every use. When one has been damaged or worn out, it needs to be replaced immediately.
Do not use the PIRASTRO KorfkerRest® before the defect or missing locking ring has been replaced.
The bendable maple
The unique bendable maple should be checked for cracks before every use, especially after having been bent or after a fall.
If this happens by accident, please give the wood time to readjust to regular temperatures and humidity levels before use or bending the wood.
When the PIRASTRO KorfkerRest® becomes dusty, simply clean it with a dry or slightly moist soft cloth.
Never use alcohol to clean the surface of the wood as this will severely damage the varnish.
146054997, 146221859, 146757899, 146759440, 146761630, 147316426, 147324445
Shipment

PIRASTRO KorfkerRest® for Violin Model 2
Art. No. 700010
- PIRASTRO KorfkerRest® for Violin
- ErgoPack with screws
- Torx key (size 8, for all screws)
- Rubber pad (4 pcs.)
- Locking rings (6 pcs.)
- Protection bag
- Printed manual

PIRASTRO KorfkerRest® for Viola
Art. No. 700020
- PIRASTRO KorfkerRest® for Viola
- ErgoPack with screws
- Torx key (size 8, for all screws)
- Rubber pad (4 pcs.)
- Locking rings (6 pcs.)
- Protection bag
- Printed manual

ErgoPack
with screws/rings
Art. No. 701084

Rubber pad, 2 pcs.
PIRASTRO KorfkerRest® Violin
Art. No. 701078

Rubber pad, 2 pcs.
PIRASTRO KorfkerRest® Viola
Art. No. 701079

Locking rings
6 pcs.
Art. No. 701083
 Torx key
PIRASTRO KorfkerRest®
Art. No. 701090
 Rubber foot
PIRASTRO KorfkerRest®
Art. No. 701054

Rubber foot, long
PIRASTRO KorfkerRest®
Art. No. 701056

Rubber foot
assembly, short
PIRASTRO KorfkerRest®
Art. No. 701049

Torx screw, 4 pcs.
PIRASTRO KorfkerRest®
Art. No. 701086
 Torx flange screw, 2 pcs.
PIRASTRO KorfkerRest®
Art. No. 701087